This
description based on the preceding exercices and on Basic
Notions about Resources.
This description will add resources to Document_Ex12.ADsrc, found on
the CD in the folder
- Sample/Try This/FolderEx12/.
The modified document will be saved as
- Doc Example.ADsrc (source,
"W" in the icon).
- Doc Example.ADcomp (compiled, "P"
in the icon)
Both files can be found on the CD at
- Samples\Try This\Example Folder
The description presumes all resources (pictures, sounds available)
found at
- Samples\Try This\Example Folder\Example Resources
FIRST PART
Let's say that we want a Multiple Choice like
this.
- Choose Multiple Choice... from the menu Create Element
of ADWorks. This opens the Multiple Choice Dialog with the Example Setting
1
- Choose this Example Setting
and replace the text of the Example Setting as indicated on the illustration.
See Result after OK.
- Open the Evaluation Dialog of the Resource Active List. See
Result. Note: Actually the text from the Multiple Choice Dialog replaces
the resource. On the last illustration TX means Text.
- Click in first line and choose Modify Resource (this will replace
TX by FN, a file), Illustration.
- Choose Picture at Select Resource File of the Resource
Dialog. See Illustration. (See
also this illustration).
- Guide the Open Dialog to the Picture you want for the Beartooth Falls
(On this Illustration it is at Example
Resources\Waterfalls)
- Back to the Resource Dialog we set DIRECT Display mode (See meaning
DIRECT at Basic Notions about Resources), see
Illustration.
- Back to the Evaluation Dialog, (TX is now replaced by a FN, a file,
in the first line), see Illustration.
Note: Observe in that last illustration the Path Example Resources\Waterfalls\BearToothFalls.jpg.
The Path is always relative to the path of the AD document. (More about
this at Basic Notions about Resources).
- Click second line and create a link to picture of the Rhine Falls
and click in third line to create a link to the Niagara Falls. See
Illustration.
- Leaving the Evaluation Dialog of the Resource Active List with OK
gives this result.
- Arrange the size and position of the Active List with these
handles.
- Arrange the size and position of the Choose Box with these
handles. See Result.
- This step is optional: Observe that the list is set through the Multiple
Choice Dialog second tab of the Definition Dialog of the Choose
Box. See Illustration.
- Optional step: Do the "Same
Color Operation" for the Choose Box. See Result.
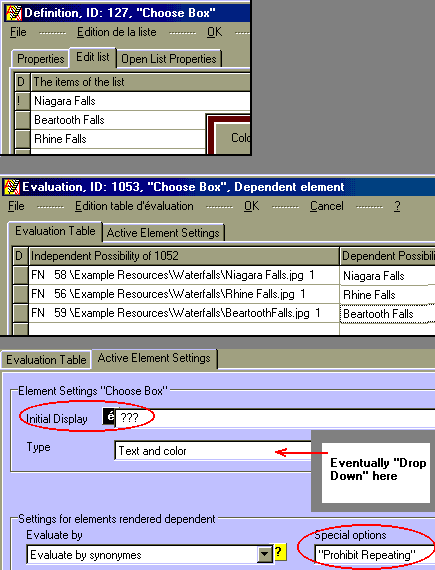
- Define the Evaluation Table and the Settings of the Choose Boxlike
this. The illustration shows that a message has been added. See that
Message. All Default Messages of the Validater has been removed (avoid
too many messages).
- Arrange the Static Text, see illustration
1, illustration 2.
- Use the Evaluation of the Static Text to define portions of
Referenced Text, see Illustration.
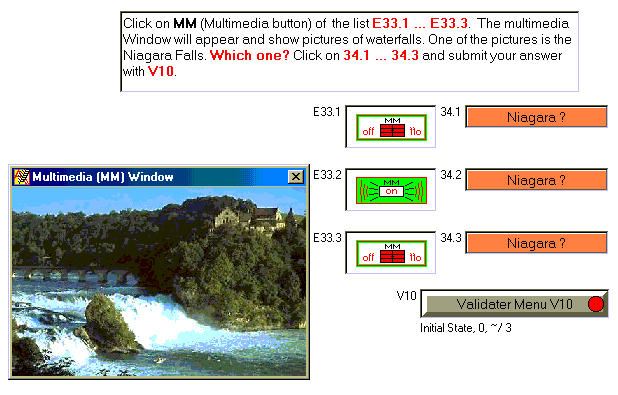
We are ready for a temporary jump to ADPlayer to test this
Multiple Choice. See Illustration 1,
Illustration
2
SECOND PART, Discussion
1) With a few clicks that Multiple
Choice can be transformed like this.
Steps needed: 1) The Static Text must be adapted. 2) The Display Mode in
the Evaluation Dialog of the Active List is to change from DIRECT to INDIRECT
for the three pictures.
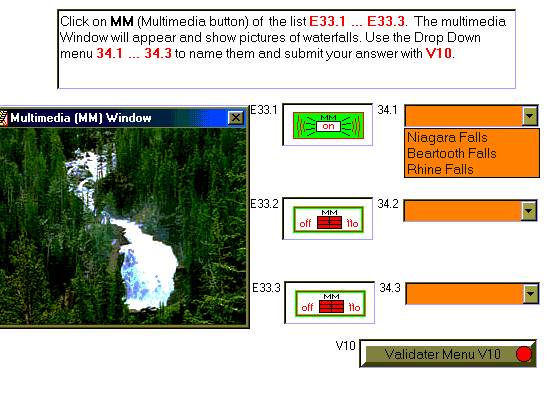
2) That Multiple Choice can be transformed
like
this, with these modifications
and with the modifications of the Static Text.It is straightforward
that this kind of question could again be used with the DIRECT Display
Mode. See Illustration. This last
version is saved under Samples\Try This\Example Folder\Example 13 bis.
THIRD PART
Let's say that we want a Multiple Choice, as Illustration
1, and Illustration 2, where
you see the user asking help for the anthem #4.
It's similar to the FIRST PART, but it makes a double use of the resources.
- Choose Multiple Choice... from the menu Create Element
of ADWorks.
- Choose this Example Setting
and replace the text of the Example Setting as indicated on the illustration.
See Result, After OK and after changing
the size changing the size if the elements.
- Open the Evaluation Dialog of the Resource Active List. Choose for
each Text Anthem XXX the File XXX
in the folder where you have prepared the sounds of the Anthems. On the
CD they are at Example Resources\Anthems. See
Illustration. Be sure to choose INDIRECT for the Display mode (the
Anthems are quite "long", see meaning of INDIRECT at Basic
Notions about Resources). Resultafter
OK.
- Open the Definition Dialog of the Choose Box, and:
1) On the List tab: link a file with a flag to each item of the list.
See Illustration. Be sure to choose
DIRECT for the Display mode (the pictures of the flags are quite small).
2) On Properties Tab: choose the white color for the element (the element
will be the support for the DIRECT display; the flags are best on white
support).
Note: As there was no such link to create link in the FIRST
PART, we did not need to use the Definition Dialog before
- Define the Evaluation Table and the Settings (Initial Display) of the
Choose
Box like this. Observe that almost
all settings are established through the choice of the Example Setting
of the Multiple Choice Dialog.
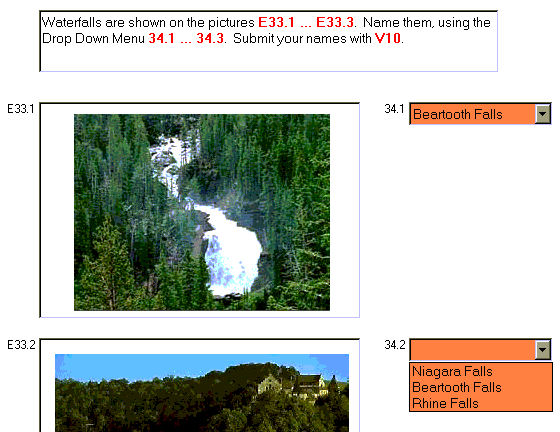
- Arrange the Static Text, see illustration
1, illustration 2.
- Use the Evaluation of the Static Text to define portions of
Referenced Text, see Illustration.
We are ready for a temporary jump to ADPlayer to test this
Multiple Choice. See Illustration
(Size and position have been arranged). We have to add the hints, promised
in the Static Text.
- Open the Evaluation Dialog of the Validater and define the Messages
for the hints like this. In exercise
14 we will add a message for the solution. This will need a message with
resources.
We are ready for a temporary jump to ADPlayer to test the hint.
See
Illustration, the user is asking help for the anthem #4.
Note: The Static Text should always indicate clearly the user what
he has to do and what are possibilities. He must guide the user. The guidelines
in the Static Text of the current example are
1) Click the MM button..
2) Use the Multimedia Player..
3) Repeating clicks on
4) Shift click gives..
5) Hints available
Observe these points on that illustration.
This document is saved saved with the name Doc Example.ADsrc
(with a "W" in the icon).
The compiled file is Doc Example.ADcomp (with a "P" in
the icon)
Back to try this